“Upgrade your MACHENIKE F117 Laptop with New Cooling Fan”: Available now at [price_with_discount]

New Replacement CPU GPU Cooling Fan for MACHENIKE F117-V VB VC VD VR VG VB2S Laptop 1323-01AU000 Cooling Fan Date First Available ‏ : ‎ June 14, 2024 Manufacturer ‏ : ‎ wangpeng ASIN ‏ : ‎ B0D73L33Q2 100% Brand New And High Quality3 months WarrantyAs the pictureOnly Compatible Model: for MACHENIKE F117-V VB VC VD VR VG VB2S Laptop 1323-01AU000 Series LaptopPlease check both the model and picture before purchase

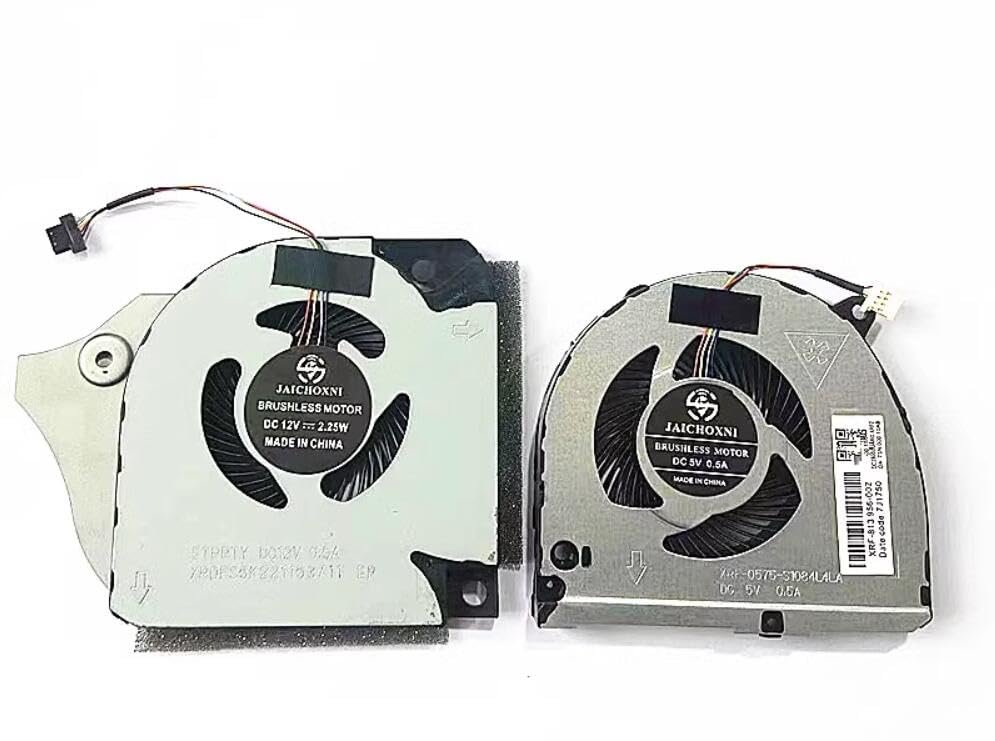
This product is a new replacement CPU GPU cooling fan made by the manufacturer wangpeng for the MACHENIKE F117-V VB VC VD VR VG VB2S Laptop 1323-01AU000 series laptop. It is 100% brand new and high quality with a 3-month warranty. The fan is only compatible with this specific model, so it is important to check both the model number and the picture before making a purchase. The product was first made available on June 14, 2024, and has an ASIN number of B0D73L33Q2.

Price: $19.82
(as of Sep 15, 2024 23:17:01 UTC – Details)


Related Posts
Read More

“UL Certified Gaming Laptop Charger for MSI GF63 GF65 Thin (180W 150W 120W)”: Available now at [price_with_discount]

From the brand nicpower brand storynicpower brand story brand logobrand logo

As a worldwide top charging equipment expert, Nicpower put the quality and safety of our charg-ers above all else.

we want your charging experience to be efficient, safe, reliable, convenient and nothing else.And yes, we make it happen with the most advanced charging technology.

For MSI Laptops

For Domestic Appliance

How to choose a charger correctly for your laptop?

1. Please check the size of the DC connector of the original charger and wattage (Output :xx V - xx A).

2. If you don't have an original charger to refer to, you can find the label on the bottom of the computer to check the output voltage and amperage.

3. If you are not sure, please feel free to let us know

after supportafter support
Safety First: This product is certified by UL as its premium quality and safety system have passed UL's rigorous tests.
Compatible with MSI 180W GS65 GS66 GF63 GF75 GF66 GF76 GL66 GL76 WF66 WF76 GV15 Alpha Sword Crosshair 15 17 Creator M16 Z16 Stealth 15M GE75 GE63 GE63VR GE65 GE73 GE73VR GE75 GL63 GL65 GL73 GL75 GP63 GP65 GP73 GP75 PE62 PE72 WE63 WE65 WE73 WE75 WT70 PRO DP21 DP20Z Modern AM241 AM271 GF65 GE62 GE62VR GE70 GE72 GF62 GF72VR GL62 GL62M GL72 GL72M Laptop
Compatible with MSI GP60 GP62 GP62 GP70 GP72 GS40 GS43VR GS63 GS63VR GS73 GS73VR GS75 GT60 GT70 GV62 GV72 GX60 GX70 P65 PE60 PE70 PL60 PL62 PX60 WE62 WE72 WF65 WF75 WP65 WS60 WS63 WS65 WS66 WS72 WS75 WT60 Bravo 15 17 Creator 15M 17M 15 Laptop (Round Tip) .Not Fit For MSI GT62-63-73-75-76-80-83 Trident 3 W25 GE66-67-76 GT76-77 GP66-76 GS77 WE76 Creator Z16P Z17 Laptop
Service and Support: 30 Days No-hassle Return and 12-Month Warranty.
Output and Wattage: 19.5V-9.23A 180W (Works with 19V-6.32A 120W -150W laptop).
Read More

Ultimate Guide to the Doriteney RG P01 Wireless Gaming Controller: Compatible with Switch, PC, Steam, iOS, and Android – Featuring Hall Effect Technology and RGB Lights

Product description rg p01rg p01 rg p01rg p01 rg p01rg p01 rg p01rg p01

Parameter Adjustment

Gyroscope calibration: When in sleep mode, press the Select + Home, and LED1-LED4 will flash up and down. Place the gamepad on a horizontal surface and press the Start key, and LED1-LED4 will all lighet up, and the calibration is complete.Joystick light mode: R3 + CAP key can modify the joystick light mode, etc. rotate between the magic color automatic gradient mode, the light color constant light mode, the light breathing automatic color change mode, the light same color constant light mode, the light same color breathing mode, and the light off.Rapid fire setting: First press and hold the button to set the rthen press and hold the TURBO key to enter semi-automatic rapid apid fire, fire, press again to enter fully automatic rapid fire, and press again to cancel the rapid fire.Rapid fire level: TURBO + right joystick up and down can adjust the rapid fire speed.Vibration level: TURBO + left joystick up and down can adjust the vibration intensity.Layout switching: TURBO +Select can swap the key values of A an and the key values of X and Y keys. d B keys.
🎮【Compatibility and Connectivity】 RG P01 game controller is fully compatible with PC, Switch, Android (version 11.0 and above), and iOS devices. It offers versatile connection options, including wireless pairing via Bluetooth and a 2.4G receiver for PC. Simply press specified buttons to switch between different modes and connect to your device seamlessly
🎮【Parameter Adjustment and Customization】Experience precise control with the gyroscope calibration feature, which can be easily activated by pressing Select + Home in sleep mode. Customize the joystick light mode to your preference with the R3 + CAP key combination, cycling through various lighting effects. Adjust rapid fire settings and speeds, as well as vibration intensity, using the TURBO key and joysticks
🎮【Layout Switching and Button Mapping】 RG P01 allows for flexible layout switching, enabling you to swap the key values of A and B, as well as X and Y, with the TURBO + Select combination. Macro programming mode lets you create custom button sequences for streamlined gameplay. Press M1 or M2 while holding down the buttons you wish to program, then finalize by pressing M1 or M2 again
🎮【Power Management and Sleep Mode】The controller features a built-in battery with convenient power management options. LED indicators display the current power status and charging progress. Automatically enter sleep mode after 5 minutes of inactivity to conserve battery life. Wake up the controller by pressing the HOME button
🎮【LED Status & Pairing Indicators】LED1-LED4 provide visual feedback for pairing status and mode selection. Once paired, pressing the HOME button will reconnect the controller to the host device automatically. During pairing, follow the specific LED pattern for your device (e.g., Android, iOS, Switch) and press the corresponding buttons to establish a connection
Read More

“BoxWave MagnetoSnap PD 100W Charging Cable Compatible with Ayaneo Next Pro”: Available now at [price_with_discount]

BoxWave Cable Compatible With Ayaneo Next Pro.

Magnetically charge your Next Pro and all your other high powered devices with ease with the
MagnetoSnap PD AllCharge Cable!

Capable of delivering up to
100 WATTS of Power, the MagnetoSnap 100W PD All-Charge Cable is the only cable you will ever need to charge your Next Pro, and other high-powered devices, including Laptops.

Integrated magnetic capabilities allow for easy
INTERCHANGING between multiple devices, enabling the use of one cord for all your gadgets! 3 magnetically charged connectors including USB-C and Micro USB are all included for your convenience. Your choice of Interchangeable detachable connector plugs remain in your Next Pro then simply “SNAP” to the cord when it’s time to charge.

Conveniently charge your Next Pro whether your power source is a USB Type-C PD charger, or the traditional USB A charger! You can use this cable to CHARGE ALL of your devices!

Plug the MagnetoSnap 100W PD All-Charge Cable into your computer for
BLAZING FAST data transfers!

Braided Nylon cable makes this cable
STRONGER and more durable than the traditional plastic covering and is less likely to knot, stretch or fray.

Gotta
CHARGE THEM ALL, with the MagnetoSnap PD AllCharge Cable!
⚡ [HIGH POWERED] BoxWave Cable Compatible With Ayaneo Next Pro. Capable of delivering up to 100 WATTS of Power, the MagnetoSnap 100W PD All-Charge Cable is the only cable you will ever need to charge your Next Pro, and other high-powered devices, including Laptops.
🧲 [MAGNETIC] Integrated magnetic capabilities allow for easy INTERCHANGING between multiple devices, enabling the use of one cord for all your gadgets! 3 magnetically charged connectors including USB-C and Micro USB are all included for your convenience. Your choice of Interchangeable detachable connector plugs remain in your Next Pro then simply “SNAP” to the cord when it’s time to charge.
✓ [BACKWARD COMPATIBLE] Conveniently charge your devices whether your power source is a USB Type-C PD charger, or the traditional USB A charger for lower powered devices! You can use this cable to CHARGE ALL of your devices!
🏃 [FAST DATA TRANSFER] Plug the MagnetoSnap 100W PD All-Charge Cable into your computer for BLAZING FAST data transfers!
💪 [STRONG AND DURABLE] Braided Nylon cable makes this cable STRONGER and more durable than the traditional plastic covering and is less likely to knot, stretch or fray.
Read More

X1 Wireless Gaming Headset: Ultimate Compatibility and Long Battery Life: Available now at [price_with_discount]

Product Description Gaming headset XboxGaming headset Xbox xbox headset xbox headset wireless xbox one headset

1. Plug the Receiver to Xbox Controller directly. (Extra Microsoft Adapter needed (Not Included) when connect to old version controller)

2. Low battery of the controller can cause insufficient power supply to the receiver, the headset might not work. Please ensure sufficient power of the controller.

The video showcases the product in use.The video guides you through product setup.The video compares multiple products.The video shows the product being unpacked.

Troubleshootings for X1 Gaming Headset

Detailed demonstration for the X1 operations

1. Why can't I connect the headset with controller?

2. No sound from the microphone? Microphone sound too low?/Why can't my teammates hear me?

3. Echo from the microphone?

4. Why is there a lot of noise?/Headset volume too low?

The video showcases the product in use.The video guides you through product setup.The video compares multiple products.The video shows the product being unpacked.

Plug the dongle tightly and fully

How to plug the dongle to controller correctly?

× The dongle not plugged in tightly (there is a gap) It may cause noise, static, low volume, or no sound in the headphones.

√ The dongle plugged in tightly and fully (no gap) Please plug the dongle fully and tightly,so that could avoid noise, static, low volume, or no sound in the headphones.

The video showcases the product in use.The video guides you through product setup.The video compares multiple products.The video shows the product being unpacked.

Plug the X1 Dongle to the Xbox Controller directly

How to connect the Headset to Xbox Controller?

1. Plug the X1 Dongle to the Xbox Controller directly. (Not support the 3rd parties' controller)

2. While the Leds of the dongle flashing, please turn the headset power on.

3. Please keep the headset on 2.4GHz mode. (You could hold the Light Button to swith it to 2.4GHz or BT Mode)

4. Click the 'Xbox Accessories' option on your xbox device, makes the headset connect to it. Choose the 'Volume' option and enter into the 'Audio and Music' interface to turn the headset volume and mic on.

wireless headset headset gaming headset xbox one ps5 headset ps4 headset gaming headphones xbox headset with mic wirelessxbox headset with mic wireless

Please confirm the receiver is inserted to the controller or devices tightly and fully, to avoid the noise or echoes caused by the poor contact.

xbox pc headset computer headset

Why can't I connect the headset with controller?/Headset doesn’t work?

Confirm if you are in Bluetooth Mode or 2.4GHz Mode. The 2.4GHz dongle cannot be connected in Bluetooth mode. You need to switch to 2.4GHz mode.

No sound from the microphone? Microphone sound too low?Mic doesn’t work?

Confirm the settings on the Xbox console, whether the microphone sound is turned up to the maximum at the (Headset chat mixer)? Adjust the game sound and chat sound to the center to make them be balanced. Assure the microphone is properly plugged in

Why the volume is low while connect to the Xbox?

Make sure the (Headset Volume) on the Xbox console is set to maximum. When using the headset for the first time, the default volume on the console is 80%. And please insert the dongle tightly and fully.

Echo from the microphone?

Turn off monitoring mode in the Xbox console settings.

While connecting, headset sound got noise or echoes?

Make sure the transmitter is fully inserted into the controller. If the transmitter is not fully inserted, there will be significant electrical noise in the headset.


Wide Compatibility: Our wireless gaming headphones are equipped with both Bluetooth and 2.4G dual modes: ①. Allowing for wireless connection to Xbox controllers (Please note that the X1 Receiver only support the Official Controllers instead of the 3rd parties, and you need an extra Microsoft Adapter (Not Included) when connecting with an old version Xbox One controller) ②. as well as seamless compatibility with PC, PS5, laptops via a 2.4GHz receiver. ③. Mac and Switch supported by Bluetooth mode. Just plug and play for instant gaming immersion.
Superior Sound Quality: Immerse yourself in the game with our 50mm speakers and 3D surround sound technology. Hear every detail and experience realistic game sound effects. The noise-canceling microphone ensures clear communication with your teammates, enhancing teamwork during intense gaming sessions.
Extended Battery Life and Low Latency: Enjoy uninterrupted gaming with up to 40 hours of continuous playtime on a single charge, fully charge only need 2 hrs. Our wireless headphones feature low latency technology(<20ms ), providing instant audio feedback without any noticeable delays, allowing for faster reactions and better gameplay.
Comfortable and Durable Design: Designed for long gaming sessions, our headphones prioritize comfort and durability. The adjustable headband and memory foam ear cushions provide a customized fit, ensuring hours of comfortable gameplay. The durable construction ensures longevity, making these headphones a reliable companion for avid gamers.
Convenient Controls: Take control of your gaming experience with easy-to-reach buttons on our headphones. Adjust the volume, mute the microphone, or control other settings directly from the headset, allowing for a seamless and effortless gaming experience.
How to activate the mic function on Xbox: ①.Connecting to the controller, enter to the interface - Click the Choose the - Click the - See the and choose the